[SIZE=3][FONT=Times New Roman]Nowadays HD videos are more and more popular among our life, but what is HD video?[/FONT][/SIZE]
[SIZE=3][FONT=Times New Roman]High-definition video or HD video refers to any video system of higher resolution than standard-definition (SD) video, and most commonly involves display resolutions of 1280×720 pixels (720p) or 1920×1080 pixels (1080i/1080p). So with more and more devices and equipments available to play and record HD videos, it became people’s favorite video format for enjoying more wonderful video very soon.[/FONT][/SIZE]
[SIZE=3][FONT=Times New Roman]However, not all the software and devices can support this format, such as Windows Movie Maker; iPod, iPhone, Zune, Creative Zen;Youtube, myspace and other online video website. etc. Sometimes we still need a third party—4Easysoft HD Converter to solve these inconvenience. [/FONT][/SIZE]
[FONT=Times New Roman][SIZE=3] [/SIZE][/FONT]
[SIZE=3][FONT=Times New Roman]First of all, let’s make a general knowledge about what this converter can do for us:[/FONT][/SIZE]
[SIZE=3][FONT=Times New Roman]**1.**Convert among HD videos, such as HD DV, HD TS, MTS, M2TS,etc[/FONT][/SIZE]
[SIZE=3][FONT=Times New Roman]**2.**Convert among SD videos or general videos[/FONT][/SIZE]
[SIZE=3][FONT=Times New Roman]**3.**Convert SD (Standard-Definition) video or general video to HD video[/FONT][/SIZE]
[SIZE=3][FONT=Times New Roman]**4.**Convert HD video to SD (Standard-Definition) video or general video[/FONT][/SIZE]
[SIZE=3][FONT=Times New Roman]**5.**Edit or polish video - Merge, Effect, Trim, Crop and Snapshot[/FONT][/SIZE]
[FONT=Times New Roman][SIZE=3] [/SIZE][/FONT]
[SIZE=3][FONT=Times New Roman]Then let me show you how to use this software:[/FONT][/SIZE]
[SIZE=3][FONT=Times New Roman]Preparation:Download and install 4Easysoft HD Converter[/FONT][/SIZE]
[SIZE=3][FONT=Times New Roman]Step 1: Add files[/FONT][/SIZE]
[SIZE=3][FONT=Times New Roman]Click “Add File” button to load the video files that you want to convert.[/FONT][/SIZE]
[SIZE=3][FONT=Times New Roman]Step 2: Set output settings[/FONT][/SIZE]
[SIZE=3][FONT=Times New Roman]You can choose the output format from the profiles drop-down lsit.[/FONT][/SIZE]
[SIZE=3][FONT=Times New Roman]You can set Encoder, Bitrate, Channels, Resolution and so on by clicking “setting” button.[/FONT][/SIZE]
[SIZE=3][FONT=Times New Roman]Step 3: Start conversion.[/FONT][/SIZE]
[SIZE=3][FONT=Times New Roman]Click “Start” to begin the conversion with high output quality and converting speed.[/FONT][/SIZE]
[FONT=Times New Roman][SIZE=3] [/SIZE][/FONT]
[SIZE=3][FONT=Times New Roman]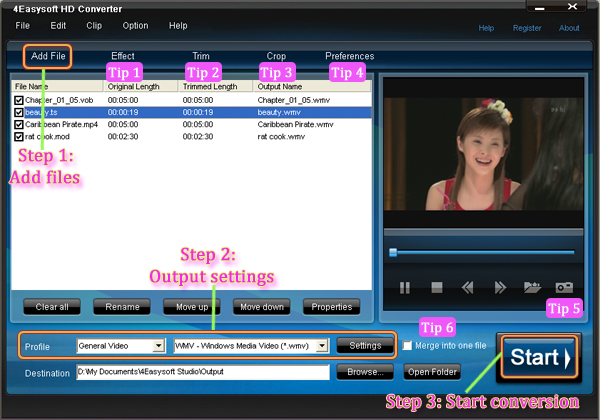 [/FONT][/SIZE]
[FONT=Times New Roman][SIZE=3] [/SIZE][/FONT]
[SIZE=3][FONT=Times New Roman]Editing Tips:[/FONT][/SIZE]
[SIZE=3][FONT=Times New Roman]Tip 1:Effect[/FONT][/SIZE]
[SIZE=3][FONT=Times New Roman]Click “Effect” button, you can set the video Brightness, Contrast, Saturation and check Deinterlacing to help you optimize the video effect.[/FONT][/SIZE]
[FONT=Times New Roman][SIZE=3] [/SIZE][/FONT]
[SIZE=3][FONT=Times New Roman] [/FONT][/SIZE]
[FONT=Times New Roman][SIZE=3] [/SIZE][/FONT]
[SIZE=3][FONT=Times New Roman]Tip 2:Trim[/FONT][/SIZE]
[SIZE=3][FONT=Times New Roman]Click “Trim” button ,you can pick up any part of your videos your videos by dragging the slider bar; clicking “Start Time” and “End Time” button or setting the values[/FONT][/SIZE]
[FONT=Times New Roman][SIZE=3] [/SIZE][/FONT]
[SIZE=3][FONT=Times New Roman]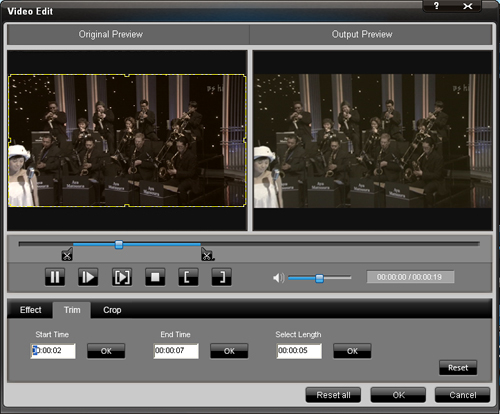 [/FONT][/SIZE]
[SIZE=3][FONT=Times New Roman] [/FONT][/SIZE]
[SIZE=3][FONT=Times New Roman]Tip 3.Crop[/FONT][/SIZE]
[SIZE=3][FONT=Times New Roman]Click “Crop” button, you can set the frame size by selectting a crop mode; adjusting the crop frame; or setting the crop values.[/FONT][/SIZE]
[FONT=Times New Roman][SIZE=3] [/SIZE][/FONT]
[SIZE=3][FONT=Times New Roman] [/FONT][/SIZE]
[FONT=Times New Roman][SIZE=3] [/SIZE][/FONT]
[SIZE=3][FONT=Times New Roman]Tip 4. Preference[/FONT][/SIZE]
[SIZE=3][FONT=Times New Roman]Click the “Preference” button you can select the output destination, the Snapshot foler, the format of the snapshot image,etc.[/FONT][/SIZE]
[SIZE=3][FONT=Times New Roman]Tip 5.Snapshot[/FONT][/SIZE]
[SIZE=3][FONT=Times New Roman]Just click the “Snapshot” button you can save any image you like when previewing the viedeo and click the “Open” button next to “Snapshot” button, you can open the image. [/FONT][/SIZE]
[SIZE=3][FONT=Times New Roman]Tip 6.Merge[/FONT][/SIZE]
[SIZE=3][FONT=Times New Roman]If you want to merge several files into one file you can choose them and click the “Merge into one file” to do it.[/FONT][/SIZE]
[FONT=Times New Roman][SIZE=3] [/SIZE][/FONT]
[SIZE=3][FONT=Times New Roman]Related tools:[/FONT][/SIZE]
[SIZE=3][FONT=Times New Roman]4Easysoft MTS Converter:[/FONT][/SIZE]
[SIZE=3][FONT=Times New Roman]It is poised to convert MTS video to AVI, MPEG, MP4, WMV and all popular video formats . And you can also convert video, like TS, M2TS, TS, MOD, TOD, MOV, FLV, WMV, HD MP4, etc to what you need video formats in fastest and most efficient way.[/FONT][/SIZE]
[SIZE=3][FONT=Times New Roman]4Easysoft TS Converter:[/FONT][/SIZE]
[SIZE=3][FONT=Times New Roman]This is an outstanding TS Video Converter, TS Video Creator, and TS file editor, so it owns the ability to convert TS to other videos, create TS file from all popular videos, and edit your TS file easily.[/FONT][/SIZE]
[FONT=Times New Roman][SIZE=3] [/SIZE][/FONT]
[FONT=Times New Roman][SIZE=3] [/SIZE][/FONT]
[FONT=Times New Roman][SIZE=3] [/SIZE][/FONT]
[FONT=Times New Roman][SIZE=3] [/SIZE][/FONT]
